> ## Documentation Index
> Fetch the complete documentation index at: https://docs.instaforge.app/llms.txt
> Use this file to discover all available pages before exploring further.
# Clients and assistants
> How InstaForge is organised: the businesses you work for, and an assistant for each of their Instagram accounts.
Everything in InstaForge is organised around your **clients**, the businesses you work for. Each client has one **assistant** for every Instagram account it runs. Most clients have one; a business with two branches or two brands can have one assistant for each account.
| | What belongs to it |
| - | - |
| **Client** | The business name, services and team, booking page, shop and products, packages and gift cards, website chat, client portal, billing and the client's own domain |
| **Assistant** | Its Instagram connection, AI brain, knowledge, behaviour rules, question flows, campaigns, posts and conversations |
What belongs to the client is shared by all of its assistants: change the opening hours or a service on one assistant and the others use it too.
## The clients list
**Clients** in the menu lists every business you work for, with its assistants, their Instagram accounts and whether they're live.
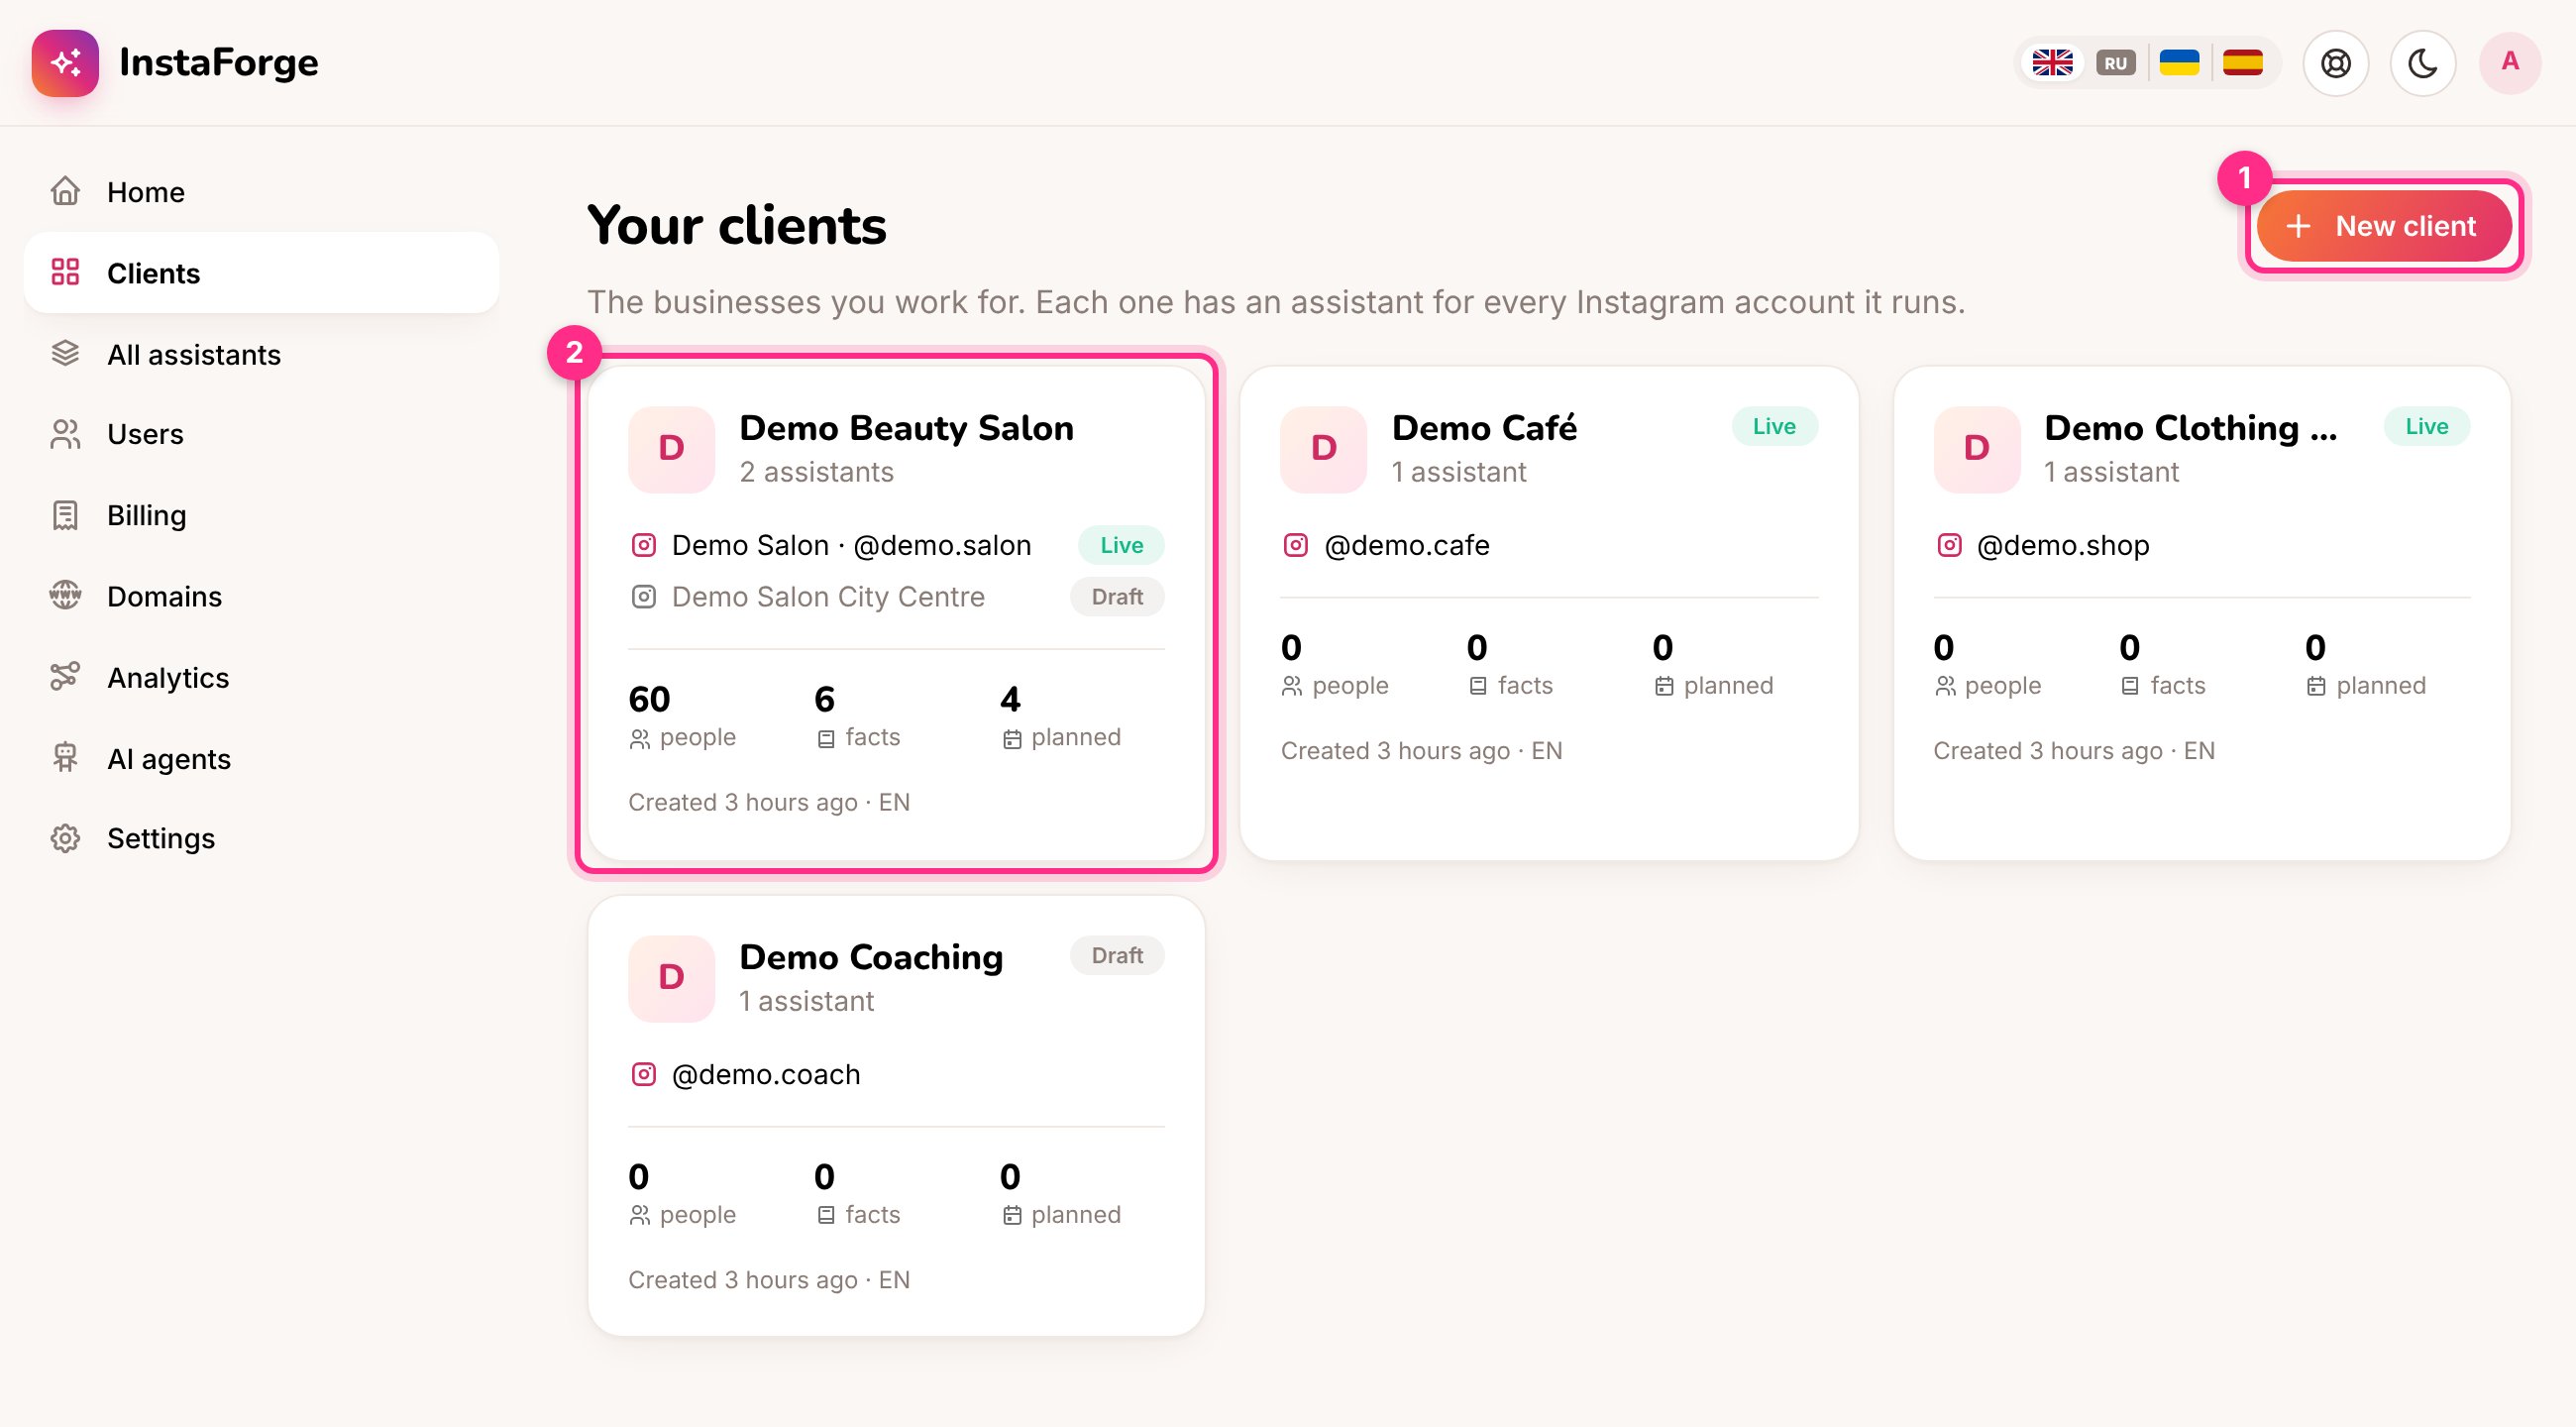 Click **New client** (1).
Type the business name customers know. The assistant gets the same name; change it if you like, only your team sees it. Pick the main language and a template, and click **Create client**.
The new assistant opens straight away, ready for [Quick setup](/getting-started/quick-start).
## A client's page
Click a client on the list to open its page.
Click **New client** (1).
Type the business name customers know. The assistant gets the same name; change it if you like, only your team sees it. Pick the main language and a template, and click **Create client**.
The new assistant opens straight away, ready for [Quick setup](/getting-started/quick-start).
## A client's page
Click a client on the list to open its page.
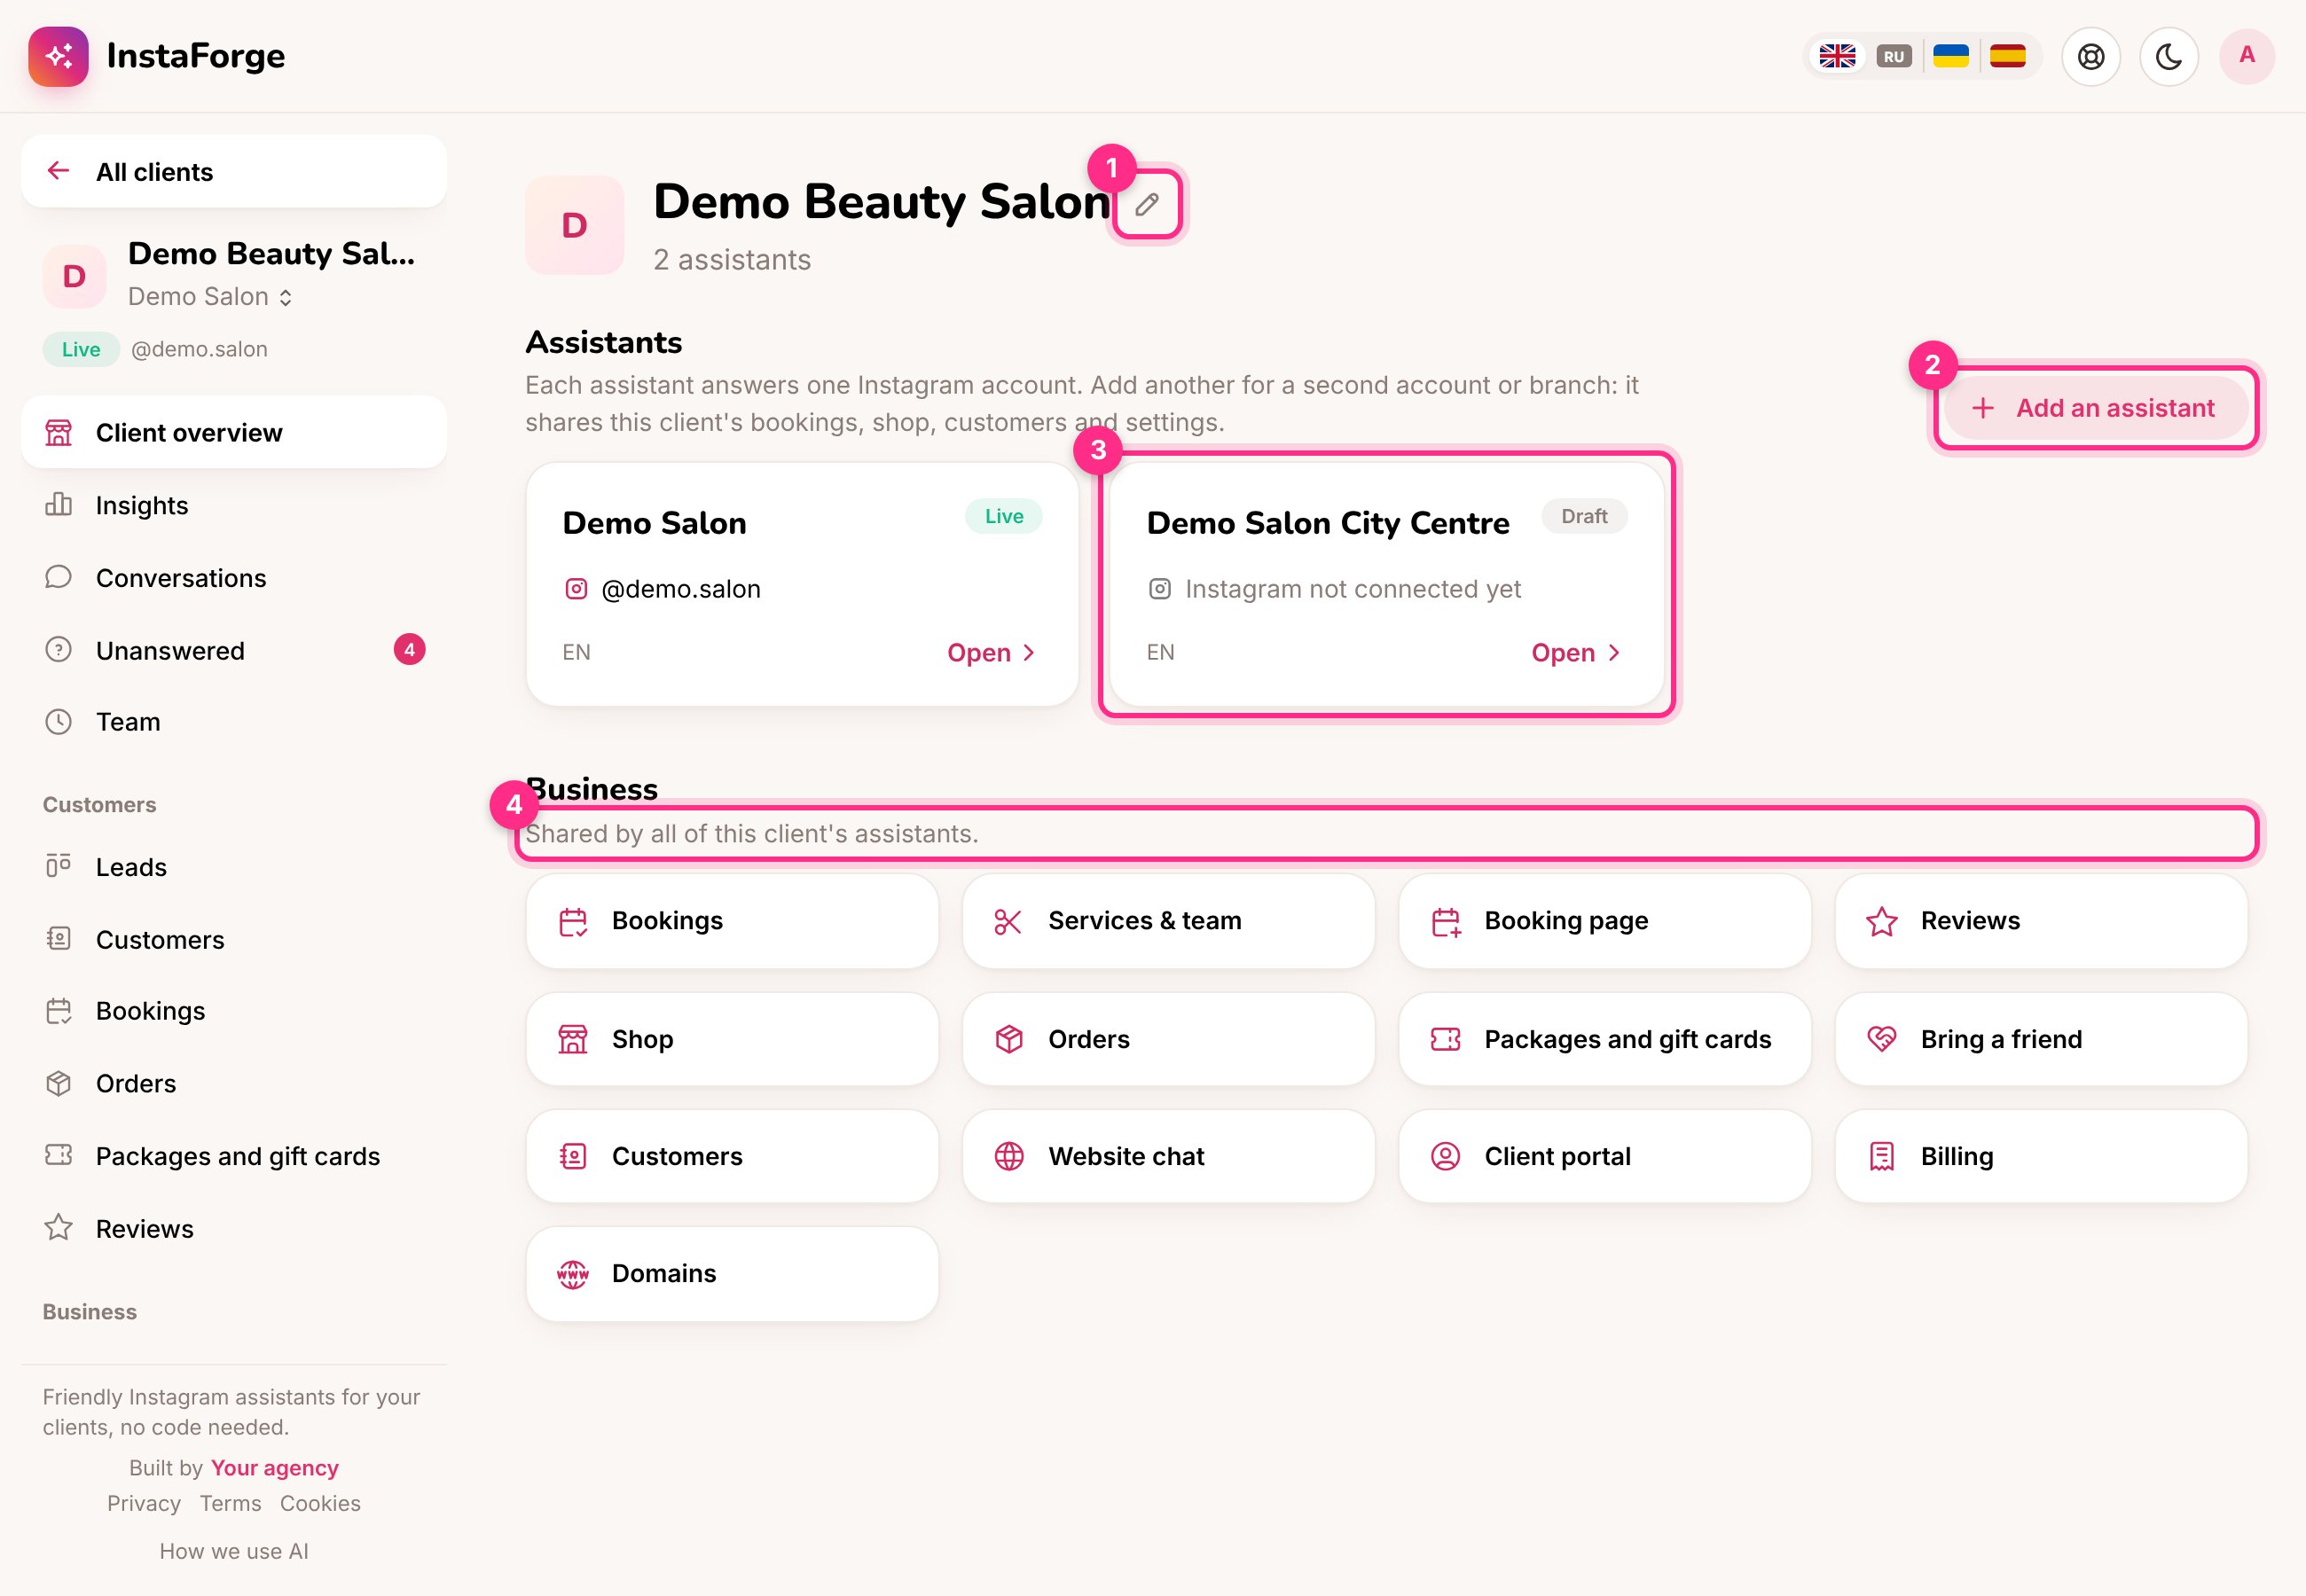 * **Rename** (1) changes the business name everywhere, including how the assistants introduce themselves.
* **Add an assistant** (2) for a second Instagram account or branch. It starts as a draft with its own knowledge and rules, and uses the client's services, shop and other business settings from the start.
* Each assistant (3) shows its Instagram account and status. Click it to open it.
* **Business** (4) opens the pages the assistants share: bookings, services, booking page, shop, orders, packages, website chat, portal, billing and the client's domain.
## Several assistants for one client
When a client has two or more assistants, they work as one business:
| Shared | How |
| - | - |
| **Calendar** | A time booked through one assistant is no longer offered by the others. Blocked time and the waiting list are shared. Bookings, the calendar and reviews show everyone's bookings, whichever assistant took them. |
| **Shop** | One product list and one order numbering. Orders taken by any assistant show on **Orders**. |
| **Gift cards and packages** | A code sold through one assistant works with all of them. |
| **Billing** | One fee and one row on **Billing**, with all the assistants' AI cost added together, and one payment reminder. |
| **Business settings** | Services and team, opening hours, the booking page, the shop, the portal and the client's domain. |
Each assistant keeps its own Instagram connection, knowledge, behaviour rules, question flows, posts, insights and monthly report (the report's title names the assistant).
### How the assistants work together
With two or more assistants, the client's page shows two settings.
* **Rename** (1) changes the business name everywhere, including how the assistants introduce themselves.
* **Add an assistant** (2) for a second Instagram account or branch. It starts as a draft with its own knowledge and rules, and uses the client's services, shop and other business settings from the start.
* Each assistant (3) shows its Instagram account and status. Click it to open it.
* **Business** (4) opens the pages the assistants share: bookings, services, booking page, shop, orders, packages, website chat, portal, billing and the client's domain.
## Several assistants for one client
When a client has two or more assistants, they work as one business:
| Shared | How |
| - | - |
| **Calendar** | A time booked through one assistant is no longer offered by the others. Blocked time and the waiting list are shared. Bookings, the calendar and reviews show everyone's bookings, whichever assistant took them. |
| **Shop** | One product list and one order numbering. Orders taken by any assistant show on **Orders**. |
| **Gift cards and packages** | A code sold through one assistant works with all of them. |
| **Billing** | One fee and one row on **Billing**, with all the assistants' AI cost added together, and one payment reminder. |
| **Business settings** | Services and team, opening hours, the booking page, the shop, the portal and the client's domain. |
Each assistant keeps its own Instagram connection, knowledge, behaviour rules, question flows, posts, insights and monthly report (the report's title names the assistant).
### How the assistants work together
With two or more assistants, the client's page shows two settings.
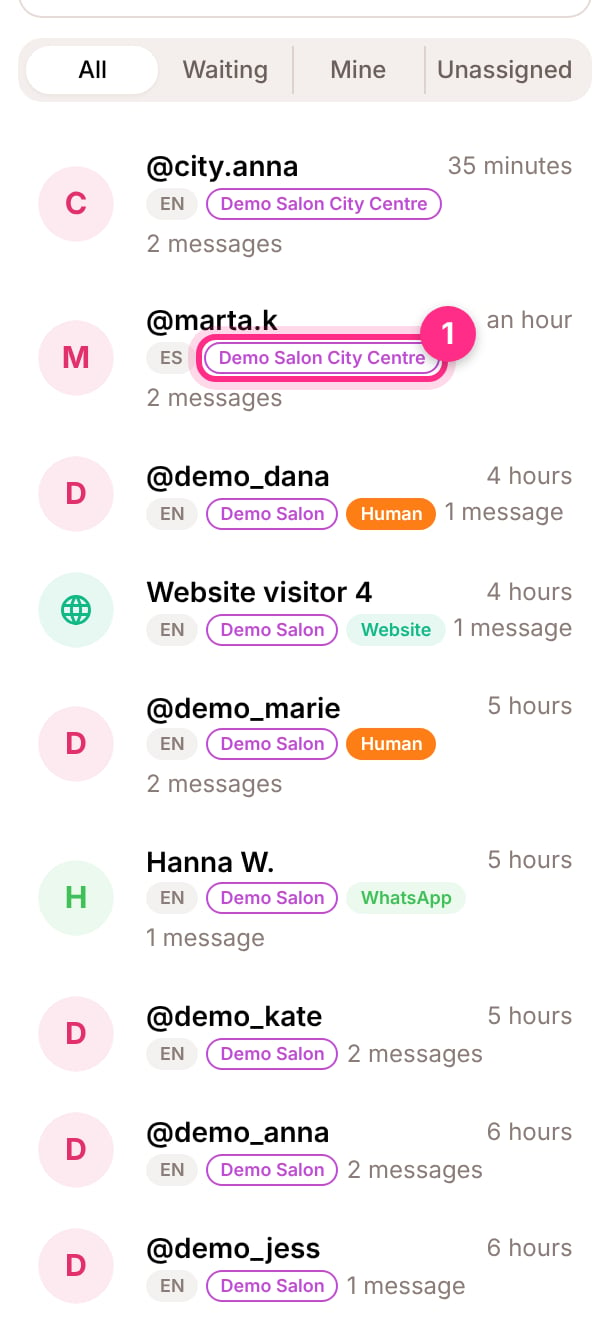
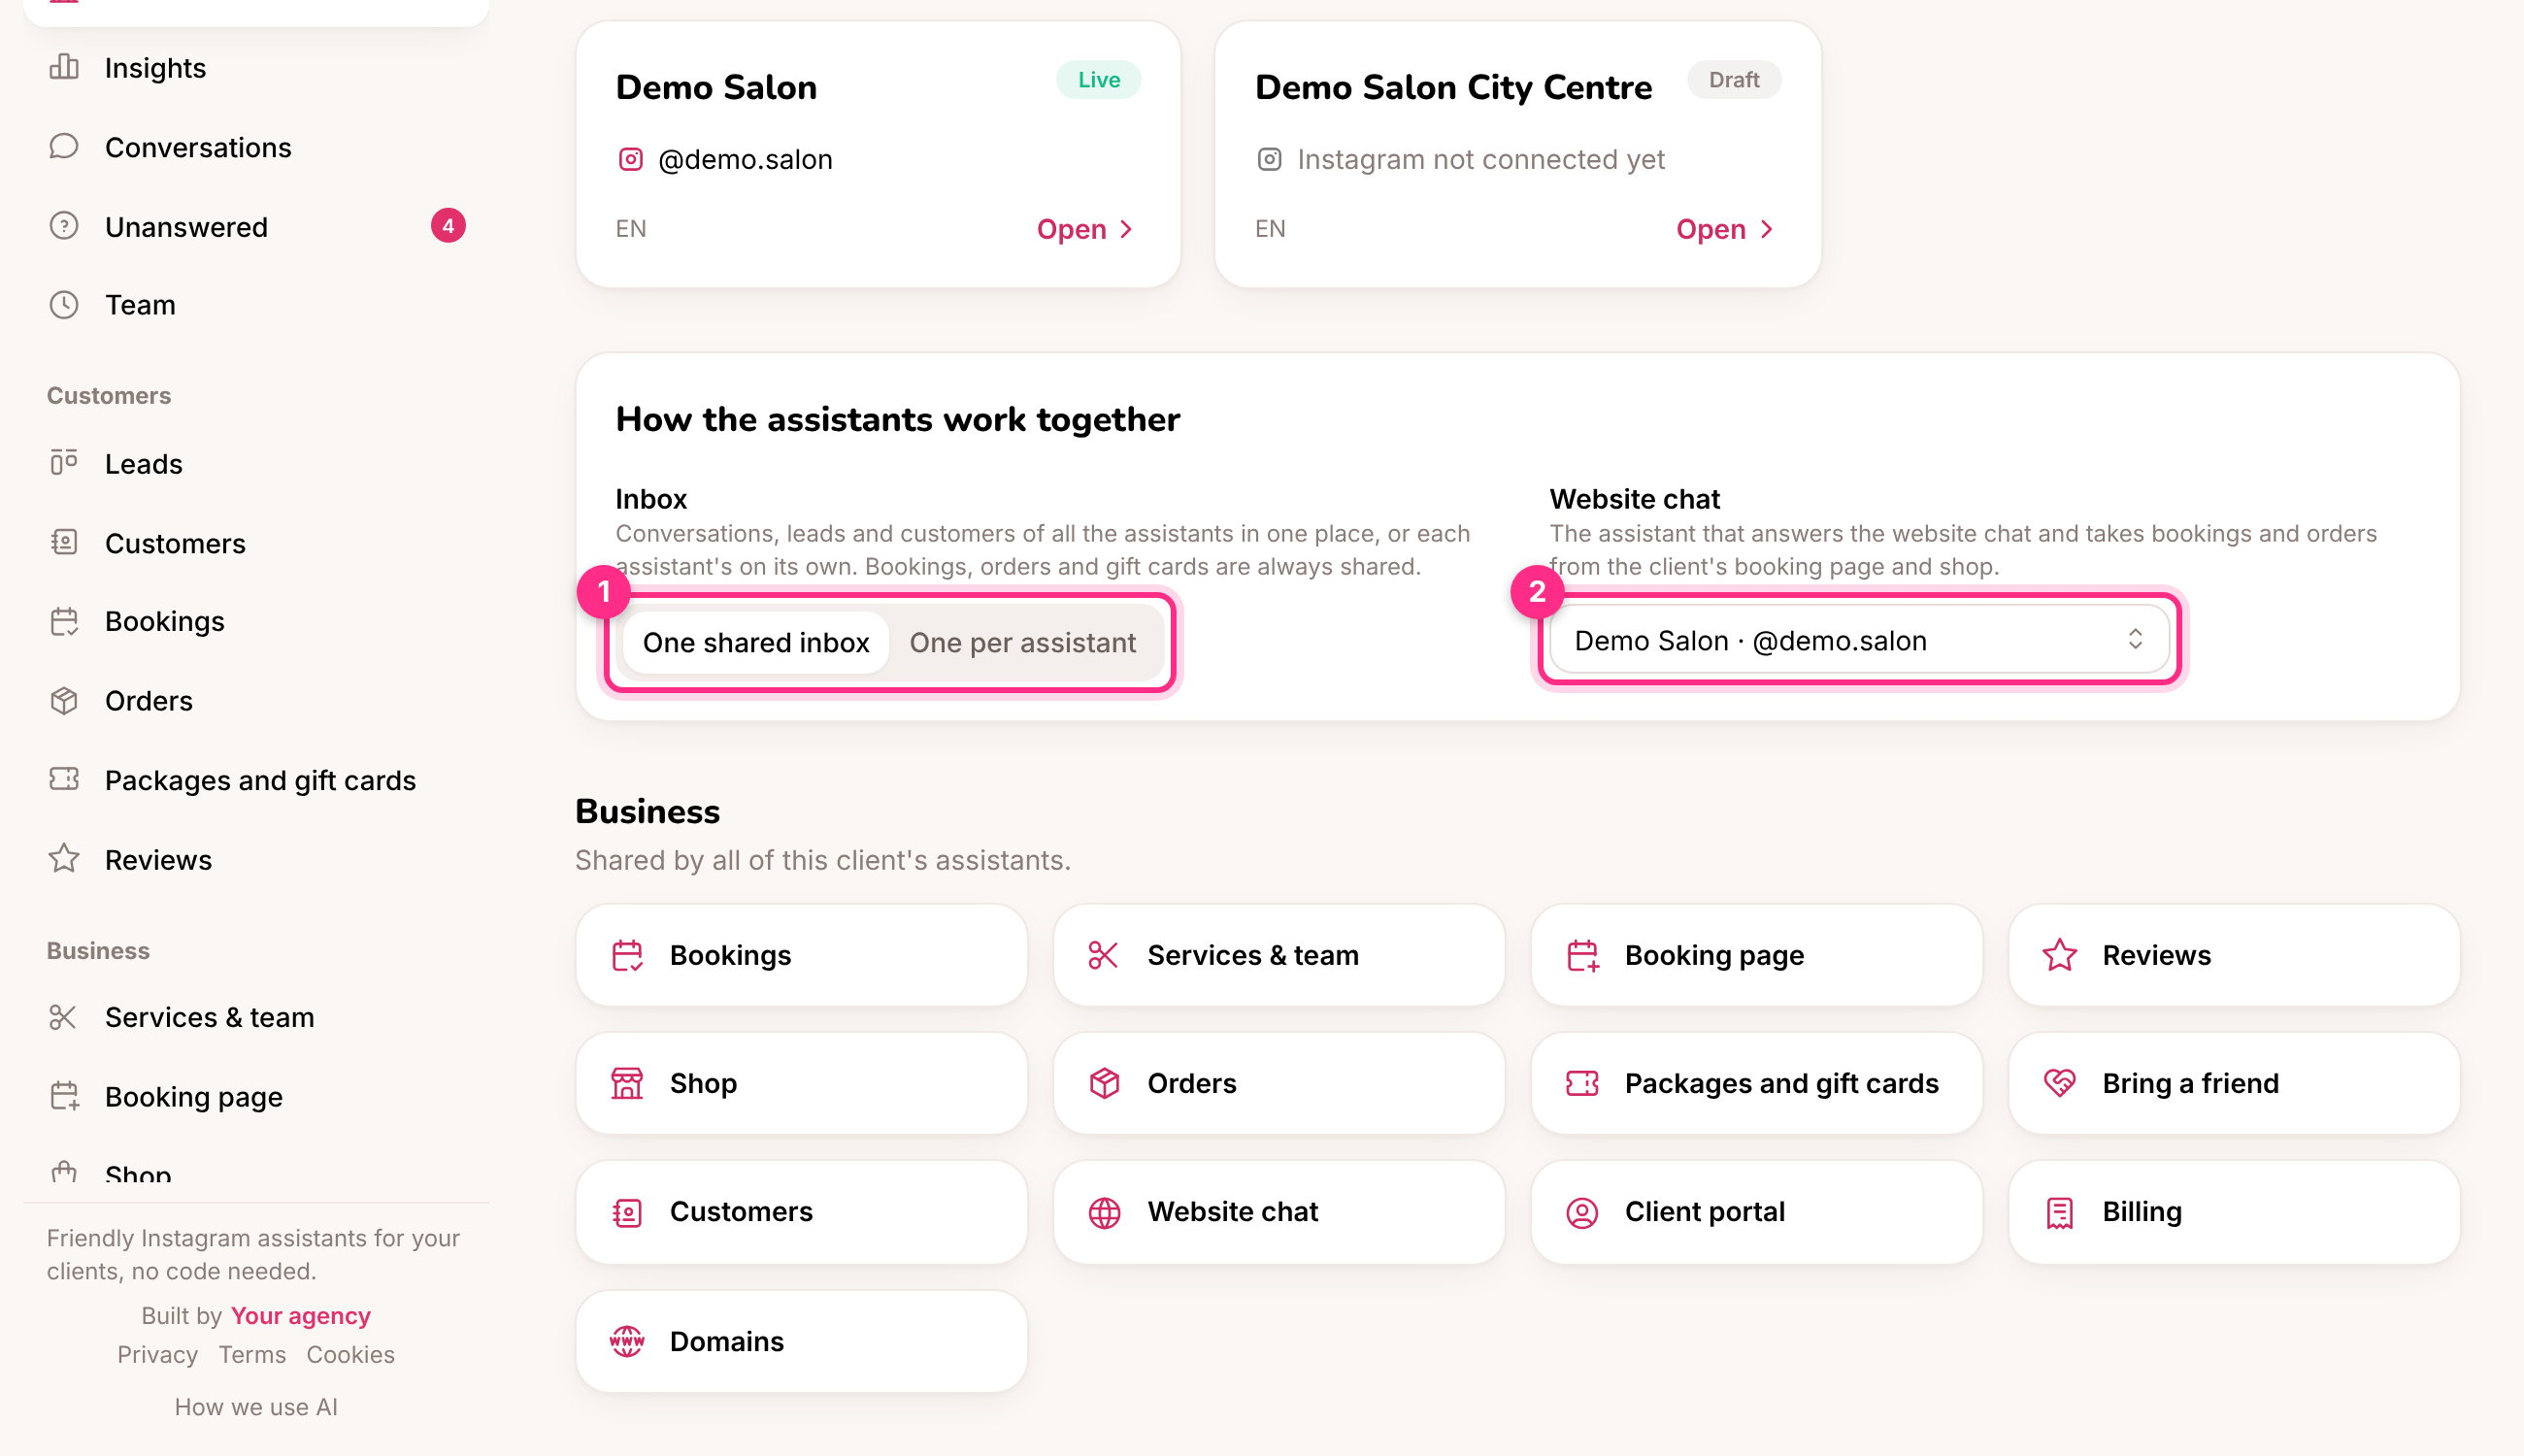 * **Inbox (1):** with **One shared inbox** (the default), **Conversations**, **Leads** and **Customers** show the people who wrote to any of the client's assistants, and a badge says which assistant each person wrote to. Your reply goes out through that assistant. Choose **One per assistant** when the accounts are run by different people.
* **Website chat (2):** the assistant that answers the website chat and takes the bookings and orders made on the client's booking page and shop. It's the first assistant until you choose another.
* **Inbox (1):** with **One shared inbox** (the default), **Conversations**, **Leads** and **Customers** show the people who wrote to any of the client's assistants, and a badge says which assistant each person wrote to. Your reply goes out through that assistant. Choose **One per assistant** when the accounts are run by different people.
* **Website chat (2):** the assistant that answers the website chat and takes the bookings and orders made on the client's booking page and shop. It's the first assistant until you choose another.
 Bringing back an older version of one assistant in **History** restores its own set-up only. The business settings it shares with the other assistants stay as they are.
## Inside a client
When you open an assistant, the menu on the left shows the client and the assistant you're working on.
Bringing back an older version of one assistant in **History** restores its own set-up only. The business settings it shares with the other assistants stay as they are.
## Inside a client
When you open an assistant, the menu on the left shows the client and the assistant you're working on.
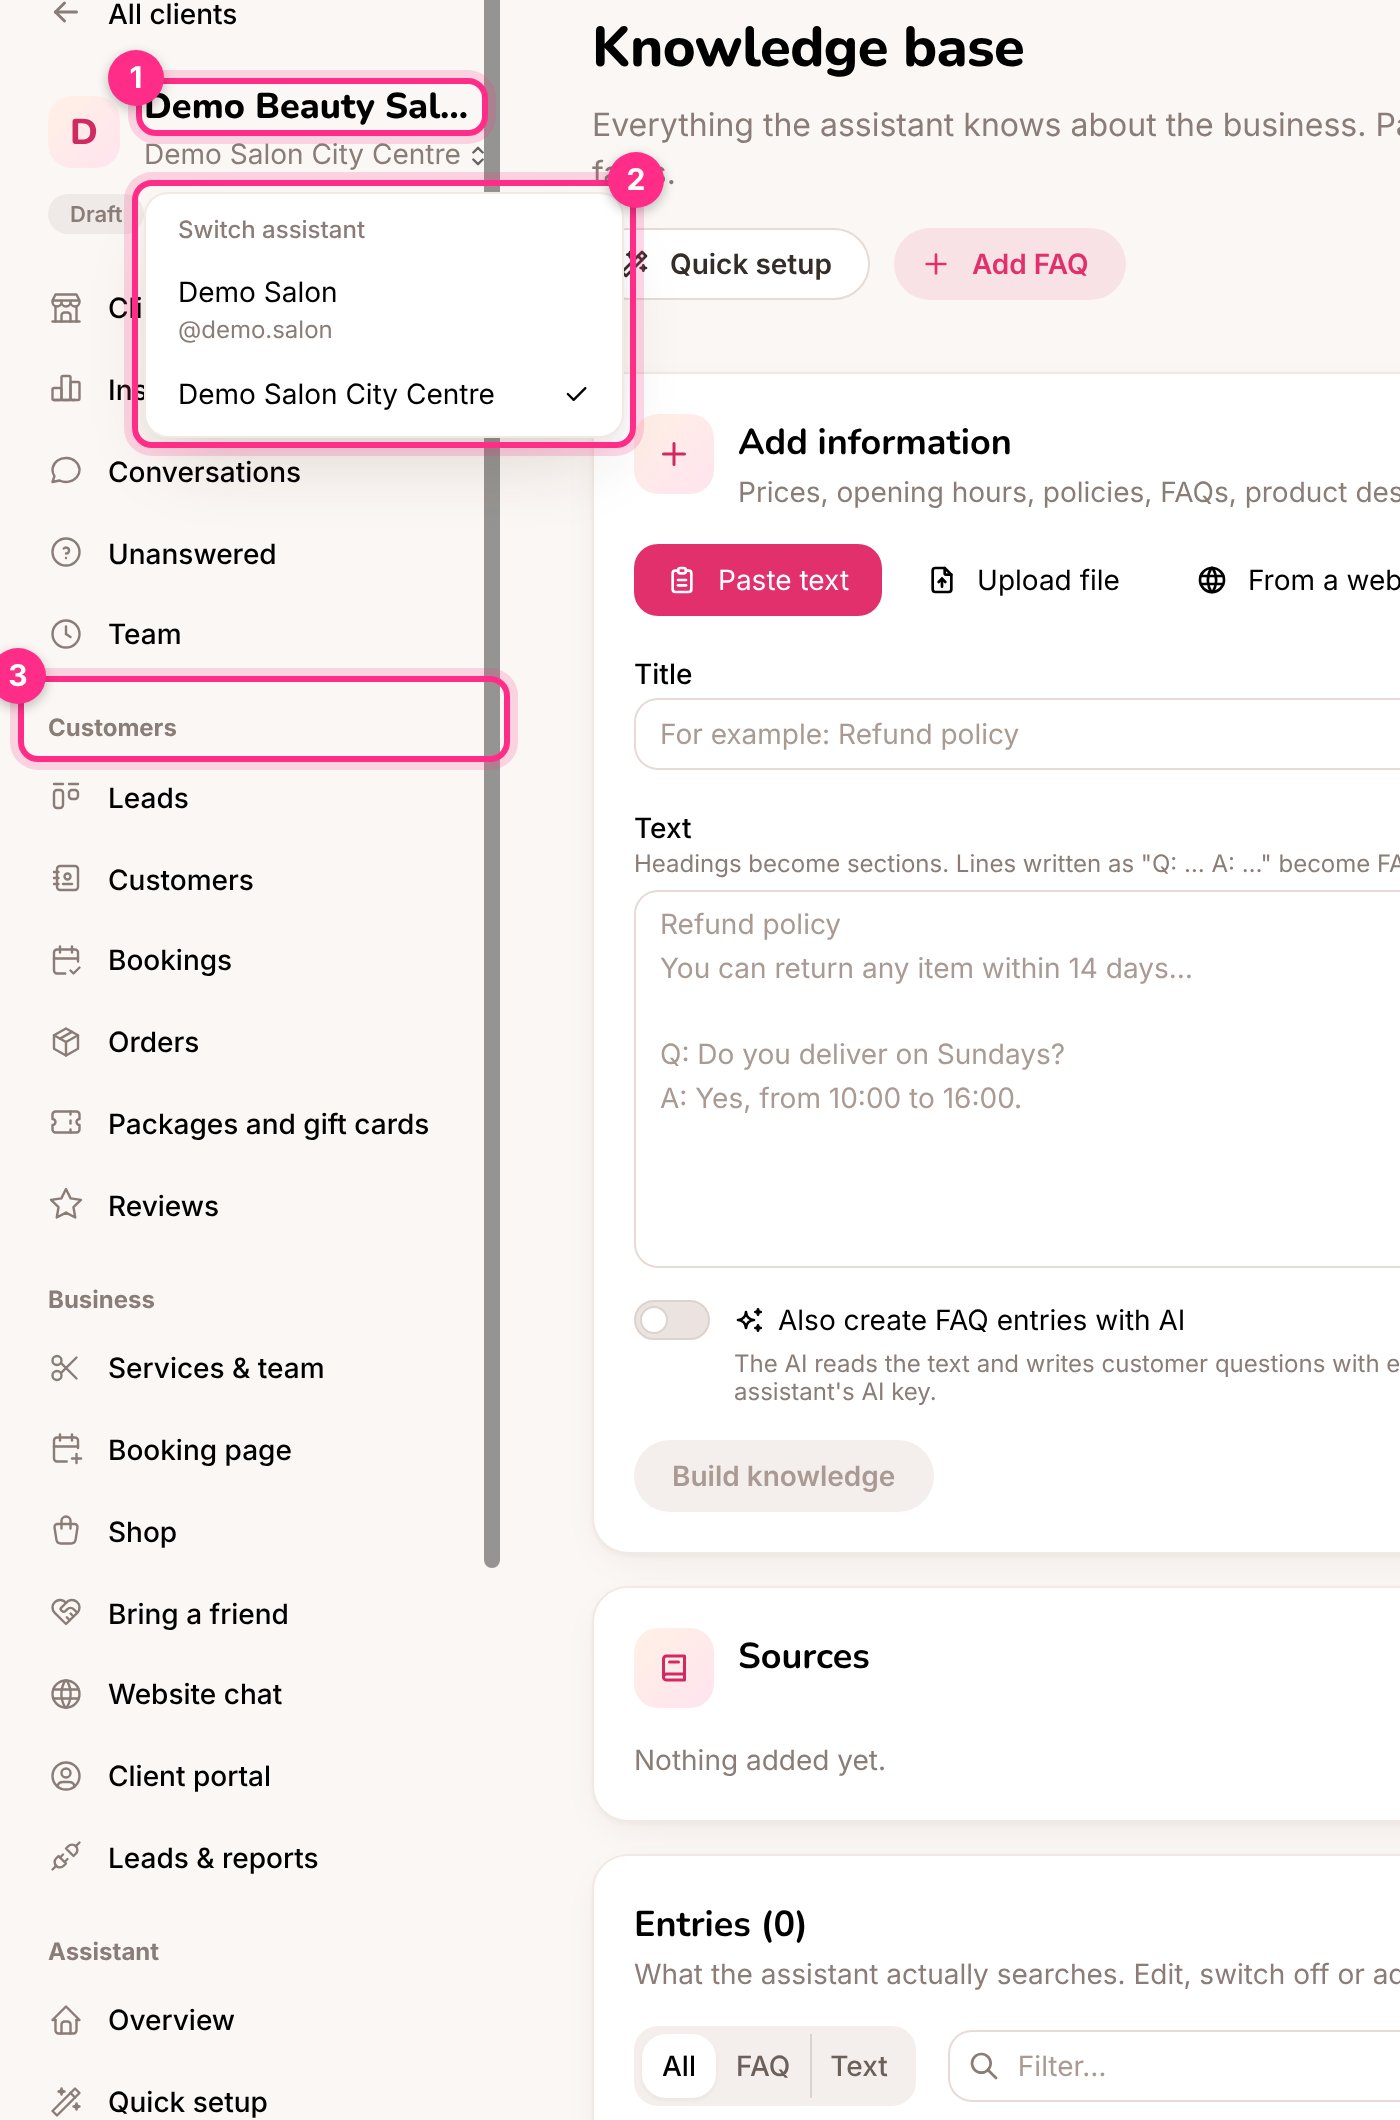 * Click the client's name (1) to go back to the client's page.
* A client with more than one assistant gets a switch under its name (2). Picking another assistant keeps you on the same page, so you can compare their knowledge or rules side by side.
* The menu is grouped (3):
| Group | Pages |
| - | - |
| (top) | Client overview, Insights, Conversations, Unanswered, Team |
| Customers | Leads, Customers, Bookings, Orders, Packages and gift cards, Reviews |
| Business | Services and team, Booking page, Shop, Bring a friend, Website chat, Client portal, Leads and reports |
| Assistant | Overview, Quick setup, AI brain, Knowledge base, Quality check, Behaviour, Questions, Follow-ups, Languages, Playground |
| Instagram and content | Instagram, WhatsApp and Messenger, Comment campaigns, Broadcasts, Comment moderation, Scheduler, Post approval, Post results, Content planner |
| Set-up | Privacy, Publishing, History, Build |
**All assistants** in the main menu is a table of every assistant across all clients, with what needs attention. Use it to check on everything at once.
Each one became a client with one assistant, named after its business. Nothing else changed: the same knowledge, rules, conversations and settings.
Yes. The limit counts assistants, not clients.
Deleting a client's last assistant removes the client too. A client you made without an assistant can be removed by an AI agent with delete\_client.
This documentation is built and hosted on [Mintlify](https://mintlify.com), a developer documentation platform.
* Click the client's name (1) to go back to the client's page.
* A client with more than one assistant gets a switch under its name (2). Picking another assistant keeps you on the same page, so you can compare their knowledge or rules side by side.
* The menu is grouped (3):
| Group | Pages |
| - | - |
| (top) | Client overview, Insights, Conversations, Unanswered, Team |
| Customers | Leads, Customers, Bookings, Orders, Packages and gift cards, Reviews |
| Business | Services and team, Booking page, Shop, Bring a friend, Website chat, Client portal, Leads and reports |
| Assistant | Overview, Quick setup, AI brain, Knowledge base, Quality check, Behaviour, Questions, Follow-ups, Languages, Playground |
| Instagram and content | Instagram, WhatsApp and Messenger, Comment campaigns, Broadcasts, Comment moderation, Scheduler, Post approval, Post results, Content planner |
| Set-up | Privacy, Publishing, History, Build |
**All assistants** in the main menu is a table of every assistant across all clients, with what needs attention. Use it to check on everything at once.
Each one became a client with one assistant, named after its business. Nothing else changed: the same knowledge, rules, conversations and settings.
Yes. The limit counts assistants, not clients.
Deleting a client's last assistant removes the client too. A client you made without an assistant can be removed by an AI agent with delete\_client.
This documentation is built and hosted on [Mintlify](https://mintlify.com), a developer documentation platform.